FAQ Page

FAQ: 3D Models & Animations
Click the buttons below to be directed to the FAQ you are interested in!
UNREAL ENGINE FAQ
Legal Details
Yes, you can use assets (even free ones) purchased on Fab.com for commercial projects. If you want to know more, know that this policy is governed by the Fab.com EULA.
You are only eligible for a Personal License if, at the time of the Transaction you, together with any controlling entity and other entities under common control with you, have not generated more than $100,000 USD in gross revenue from your commercial activity in the digital content industry in the last 12 months. If you want to know more, know that this policy is governed by the Fab.com EULA.
According to Content Distribution:
You may not Distribute Content on a standalone basis to third parties except to your collaborators (either directly or through a third-party repository) who are utilizing the Content in good faith to develop a Project with you or on your behalf. This means, for example, that you may share Content with your employees, affiliates, and contractors in a private online repository while you work on a Project together. Those collaborators you share Content with are not permitted to further Distribute the Content (including as incorporated in a Project) and must delete the Content once it is no longer needed for developing a Project with you or on your behalf. You are responsible for ensuring that any third parties you share Content with comply with the terms of this Agreement. You are solely liable for any violation of this Agreement by collaborators with respect to any Content you share. If you want to know more, know that this policy is governed by the Fab.com EULA.
In agreement with the Fab.com EULA, a “Standard License” grants you a non-exclusive and non-transferable license to privately use, reproduce, display, perform, and modify the Content in accordance with the terms of this Agreement.
Yes, you can use our 3d models and 3d animations for UEFN as well. If you are looking for a tutorial on how to import an asset on UEFN, here is the official guide from the Epic Games website.
Technical Details
No, technically importing a resource does not affect your configuration files. But we strongly recommend that you take this general precaution: create a new blank project, add the asset pack to that, then migrate from there into the main project. A few extra steps, but it gets the job done without overwriting config files.
See our Tutorial or follow this simple guide in the FAQ:
- Ensure your asset has an IK Rig setup.
- Import the animation package to retarget.
- Add the Third-Person Mannequin Template (Add button).
- Create an IK Retargeter (R-click -> Animation -> IK Rig -> IK Retargeter) and name it.
- Open the Retargeter and assign the IK Mannequin target as “source.”
- Offset slightly to visualize the difference.
- Disable Debug Draw in Debug Settings.
- In the target animation’s folder, right-click an animation and “Replace Skeleton.”
- Assign the SK_Mannequin Skeleton (/Game/Characters/Mannequin_UE4/Meshes/).
- Open the IK Rig; the animation is ready for retargeting.
- Adjust any unwanted positions by matching your character to the mannequin’s parameters in the Details Panel.
- Enter Edit Mode (Target button -> Edit Mode) and adjust bones.
- Exit Edit Mode when satisfied.
- To export: Double-click the animation, select “Export Selected Animation,” choose the path, and rename with a prefix.
- For best results, remove the preview asset’s mesh (not the socket).
Look our Tutorial or follow this simple guide in the FAQ:
- In your Assets Folder, create an IK Rig (R-Click -> Animations -> IK Rig) and rename it.
- Double-click the IK Rig and assign the target skeleton in “Preview Skeletal Mesh.”
- Right-click the Pelvis Bone and “Set Retarget Root.”
- For each bone group (spine, clavicle, upper arm, etc.), select the bones, then R-Click -> New Retarget Chain. (See video tutorial for correct bone selection.)
- Create a Solver (e.g., FullBodyIK) using the “Add New Solver” button.
- With the Solver selected, R-Click on Pelvis -> Set Root Bone on selected Solver.
- With the Solver still selected, R-Click on extremities (hands, etc.) and create goals.
- For better results, reduce the “Pull” value in the arm Goals’ settings.
With the help of developers in our community we have created a tutorial for Unreal Engine 5.
Check the video tutorial or follow this simple guide in the FAQ:
- Ensure your UEFN Drawer is empty.
- Launch Unreal Engine to import your 3D model.
- Double-click the model’s Skeletal Mesh.
- In the Skeletal Mesh window, right-click a location on your 3D model.
- Click “Remove Clothing Data.”
- Right-click the model again and select “Create Clothing Data from Selection.”
- Rename the asset and clear the Physics Asset under the Collision Menu.
- Click “Create.”
- Repeat steps 4-8 for each model part.
- Open “Window” -> “Clothing.”
- Right-click and delete all listed body parts.
- Uncheck the box under the Masks Menu.
- Save.
- Migrate your project to UEFN.
- Import your 3D model onto your map and launch the session.
If you didn’t find the answer you were looking for in the Unreal Engine FAQ, join our Discord Server!
UNITY FAQ
Legal Details
According to the Unity Asset Store EULA, END-USER may use the licensed Assets only for their intended purpose, including commercial purposes.
Assets purchased on the Unity Asset Store follow the Unity Asset Store End User License Agreement (EULA). a non-exclusive, legally binding end user license agreement between any individual or a single entity (“END-USER”) that acquires a license to an Asset from the Unity Asset Store and either (a) Unity Technologies SF (“Unity”) ; or, as the case may be (b) any third party that offers and distributes its Assets via the Unity Asset Store (“Provider”).
It seems that both 2.2.1 and 2.2.2 of the EULA make this clear:
2.2.1 Non-Restricted Assets. The following concerns only Assets that are not Restricted Assets:
Licensor grants to the END-USER a non-exclusive, worldwide, and perpetual license to the Asset to integrate Assets only as incorporated and embedded components of electronic games and interactive media and distribute such electronic game and interactive media. Except for game services software development kits (“Services SDKs”), END-USERS may modify Assets. END-USER may otherwise not reproduce, distribute, sublicense, rent, lease or lend the Assets. It is emphasized that the END-USERS shall not be entitled to distribute or transfer in any way (including, without, limitation by way of sublicense) the Assets in any other way than as integrated components of electronic games and interactive media. Without limitation of the foregoing it is emphasized that END-USER shall not be entitled to share the costs related to purchasing an Asset and then let any third party that has contributed to such purchase use such Asset (forum pooling).
2.2.2 Restricted Assets. The following concerns only Restricted Assets:
Licensor grants to the END-USER a limited, non-exclusive, worldwide license to the Asset for personal and non-commercial use; no other use is licensed or permitted. Except for Services SDKs, END-USERS may modify Assets. END-USER may otherwise not reproduce, distribute, sublicense, rent, lease or lend the Assets. Without limitation of the foregoing it is emphasized that END-USER shall not be entitled to share the costs related to purchasing an Asset and then let any third party that has contributed to such purchase use such Asset (forum pooling).
Technical Details
To set correctly your Render Pipeline (Built-in, HDRP, URP) follow this video tutorial or this simple guide in the FAQ:
- Import the asset inside your project.
- Open the SK_CharacterName inside the folder “Meshes“.
- Select the folder with the Pipeline you need.
- Open the Material Folder.
- Select the asset and assign correct materials in the inspector.
- Press apply to see the material on the asset and it’s done!

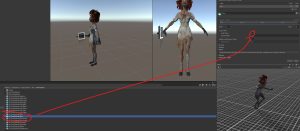
In the example shown above, our 3D Asset has import animation warnings. To solve this problem check the Translation DoF.
If you have the problem showed in the video, here is the solution. The issue happen because (probably) you are running animations in different layer and did not reset the layer, causing the interference from another layer making it rigid.
I use LeanTween to smooth the changing of the Layer weight so it looks smooth. I’ll share what the code looks like in the animation:
 public void SetPlayerAttacking(string atkAnimation, int layer, bool isAttacking)

    {

        animator.SetLayerWeight(layer, 1f);

        animator.SetTrigger(atkAnimation);

        var clip = animator.GetCurrentAnimatorClipInfo(1);

        duration = clip.Length / animator.GetLayerWeight(1);

        StartCoroutine(ResetLayer(1, duration, isAttacking));

    }

private IEnumerator ResetLayer(int layer, float duration, bool isAttacking)
{
yield return new WaitForSeconds(duration);
isAttacking = false;
LeanTween.value(gameObject, (x) => animator.SetLayerWeight(layer, x), 1f, 0f, 0.2f);
}
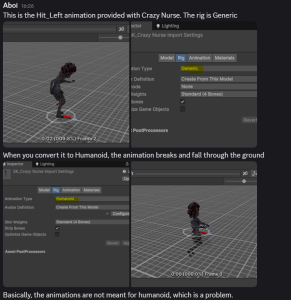
If you encounter a problem with a character’s axis, here’s what to do:
- On Blender go to file->export->FBX.
- In the Blender File View, look under Transform and set the Up in Y Up.
- Export the .fbx.
- Open Unity Engine.
- In the Inspector, in the Rig section, change the Animation Type from Generic to Humanoid and set the Avatar Definition to “Copy From Other Avatar“.
- Open the Meshes folder.
- Drag the SK_CharacterNameAvatar and drop it in the Source of the Inspector.
- Hit Apply.
- Check in the Animation Section of the Inspector if the axis is correct.
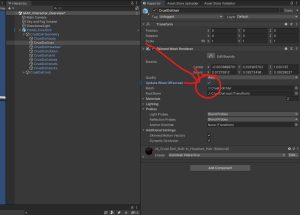
This is a problem of near clipping probably caused by bounderies. To solve this problem go into the prefab and check the “Update when Offscreen” checkbox of the mesh.
Set In Place an Animation on Unity is very simple! Just select the animation and on the right panel check the “Loop Pose” Checkbox. It should work!

To solve this problem you just need to open the Inspector and check the Bake Into Pose Box.

Often it may happen that a model does not have the material assigned. Do not worry, the material exists inside the package, you will have to reassign it manually. To do so, open the Inspector and assign it by selecting the correct material under the Materials menu.

It might happen that for the Unity 6 version there is a bug and the Skin Diffusion Profile is missing in the Horror Villains Bundle. It is probably a bug, in that case you need to manually assign it going under the Surface Inputs menu (where the error is reported in red).
If you encounter this error, the reason is that the folder and materials share the same GUIDs in unity, so maybe, when you import they override each other.

The solution is easy: delete the asset folder and reimport.


If you didn’t find the answer you were looking for in the Unity FAQ, join our Discord Server!
PRIVATE COMMISSION FAQ
The cost of custom 3D models and animations varies significantly depending on several key factors:
Model complexity: simple objects require fewer resources than detailed characters or environments, often measured by polygon count and texture resolution.
Rigging complexity: simple rigs for basic movements are less complex than those for characters, especially with facial animation.
Animation complexity: simple animations like product displays are less costly than complex character animations.
Project timeline: fast turnarounds may increase costs.
Our projects typically start at €1,800.00, with costs increasing for more complex work. Contact us through our website’s contact section with your project details for a precise quote.
We measure our production time in working days, starting from the contract signing date to the final delivery of the 3D model or animation. This ensures a clear understanding of the project’s duration.
To give you a general idea, simpler projects might be completed within a few working days, while more complex projects can take several weeks or even months.
Upon delivery, we will send you a private Google Drive link to a folder where you will find all the files you requested.
ZectorLab guarantees a backup copy for 30 working days. After this threshold, due to internal policy we do not guarantee a backup copy of the delivered project but in case it should happen, we suggest you contact us anyway, we could have it stored!
Before starting to work on the project, we undertake to sign a contract that explains various aspects including the copyright. Long story short, after the final payment is made, full copyrifht of the result is given to the Client. We will not be able to redistribute, use or modify the project. The only right we reserve is the ability to add photos and videos of the product to our portfolio.
We have created a private server where you can meet our entire team. There we will take care of sending routine updates (every 5-7 working days) plus any possible extra updates during the workflow.
In addition, thanks to these updates you will be able to send us feedback so that we can work step by step to the realization of your project.